

For those of you who maybe don't know what a Baby Groot is, you have 3 options. #1. Watch Guardians of the Galaxy; #2. Google images for Baby Groot or #3. Crawl back into the rock you live under and ignore this post completely.
Please keep in mind a few things when knitting this:
#1: This is the first knitted pattern I am sharing, so if there are errors that you find, feel free to let me know in the comments below.
#2: This is a free pattern- however that does not give you permission to sell any Baby Groots that you might create from this pattern. Unless of course you would like Marvel or any of the companies that hold the copyrights/licensing to the character to come after you for selling their characters likeness on merch without a license/express written consent. That's kind of why I'm giving the pattern away for free here.
I created this because I wanted a baby Groot of my own and prefer to knit instead of crochet. If you would like to crochet there is an excellent pattern here. Don't be fooled by links on google telling you that the pattern in that link is a knitting pattern- I assure you it is not. Yes I completely agree that the crochet version is much cuter than my version...pick your poison. Like I said above, I wanted my own Baby Groot.
Baby Groot Knitting Pattern
By: Amber L. Uphoff

Items you will need:
Yarn: Using a Lion Brand yarn (or
whatever type yarn you prefer) and knitting needles suggested for your type of
yarn.
Also use a
thinner Green yarn for vines and leaves and such.
For this
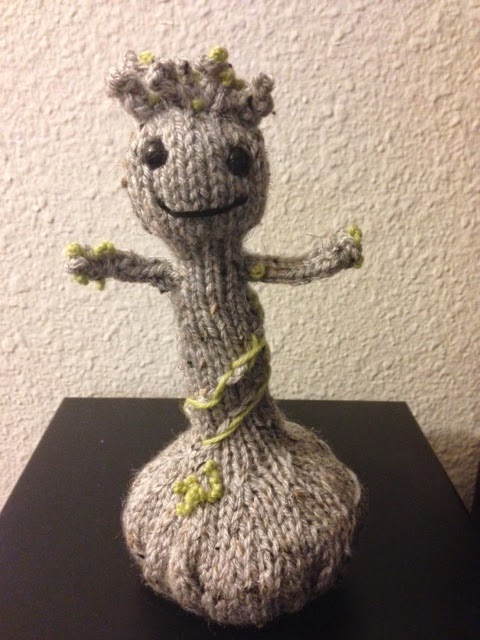
example I am using Vanna’s Choice Lion Brand yarn in the color of Grey
Marble. Groot is more of a grey
color than brown, but choose your color how you like it.
For the
Green I am using Patons Classic Wool DK Superwash in Apple Green
Circular Knitting Needles: Per the
suggestion on the yarn, I am using US 9 (5.5mm) circular knitting needles (long
enough so that I can use the Magic Loop method)
Tapestry Needle
Double Pointed Needles (one to two
sizes smaller than your circular needles)
Scissors
Stitch Marker
Polyester Fiber Fill
Safety Eyes (9 or 10 mm)
Embroidery floss - black
Method:
Magic Loop: Instructions on how to do Magic Loop can be found here
I-Cord: Instructions on how to do I-Cord can be found here
Terms used:
CO: Cast On sts:
Stitches
K: Knit M1: Make 1 stitch (either using left or right method)
K2tog: Knit 2 stitches together P: Purl
P2tog: Purl 2 stitches together BO: Bind Off
PU: Pick up stitches DPN: Double Pointed Needle
Feel free to YouTube search any of the terms for directions.
Creating the base:
1. CO 6 sts,
join in the round, being careful not to twist the stitches. Place a marker at the beginning of the
round.
2. knit
around
3. *K1, M1,
repeat from * around (12 sts)
4. K all sts
5. *K1, M1,
repeat from * around (24 sts)
6. K all sts
7. *K1, M1,
repeat from * around (48 sts)
8. K all sts
9. *K1, M1,
repeat from * around (96 sts)
10-14. K all
rows
15. (K2
k2tog) around (72 sts)
16. K all
sts
17. (K2,
K2tog) around (54 sts)
18. K all
sts
19. (K2, k2tog)
around (end with k2) (41 sts)
20. K all
sts
21. (K2,
k2tog) around (end with k1) (31 sts)
22. K all
sts
23. (K2,
K2tog) around (end with k3) (24 sts)
24. (K1, K2tog)
around (16 sts)
This is a
good time to double check that ½ of your sts are sitting on one needle and the
other half on the other.
Go ahead and
stuff the base- don’t over stuff- you want to stuff it so the bottom is flat, and pliable in case the pot you use is smaller than the base you just created- you can "stuff" the base into the pot.
Creating the trunk:
1-16. K all
rows
17. K6,
K2tog, K6, K2tog
18-21. K the
next 4 rows
22. K2tog,
k5, k2tog, K5
23-28. Knit the next 6 rows
Go ahead and
stuff the trunk- don’t over stuff.
Play around with it so that it is standing up straight. Or maybe you want your Baby Groot to look more like a tree in which case you can bend him however you want.
Creating the head:
29. *K1, M1,
repeat from * around (24 sts)
30-38. K the
next 9 rows
39. k2tog,
k10; k2tog, k10
40. K all
sts
41. add
safety eyes (9 or 10mm) and begin to stuff the head- do not over stuff.
42. K2tog
around (11 sts)
43. K2tog
around (end with K1) (6 sts)
44. cut a 6”
yarn tail, thread with tapestry needle and pull yarn thru the 6 sts.
Creating Arms (make 2):
 I’m not
nearly as creative as the motion crochet Baby Groot you can find here, at least
not with this example…but I’m sure you crafty people out there can figure out
how to make moveable arms if you wanted to.
I’m not
nearly as creative as the motion crochet Baby Groot you can find here, at least
not with this example…but I’m sure you crafty people out there can figure out
how to make moveable arms if you wanted to.
Switch to
Double Pointed needles for this…you will be using the I-Cord method for this
part.
Switch to DPN's...using needles roughly 1-2 sizes smaller than your circular needles.
1. Pick up 3
sts, roughly 5 sts below the head, on either side of the body (you will repeat
these instructions on the other side).
2-13. Knit
12 rows using the I-Cord method- which is basically you knit your stitches,
slide them to the end of the needle and start knitting again. It forms a sort of tube.
 14. BO 1 st,
K1 st
14. BO 1 st,
K1 st
15. K2 sts 2
times, cut a 10” yarn tail and pull thru sts.
16. Using a
tapestry needle pull the remainder of the yarn tail thru the length of the arm
and then wrap it around the trunk in a spiral pattern. Secure the yarn tail and cut.
Repeat on
the other side.

 Creating “foliage” on the head:
Using DPN’s:
1. Pick up 3
sts on top of the head.
2. K 3 rows
in the round, or using I-Cord method.
3. BO 3 sts,
pulling thread thru last loop.
Secure the tail end.
Repeat as
much as you want or as little. The
pictures of Baby Groot online all seem to have a healthy head of “hair” though.

Creating leaves on arms and head:
Cut a 12”
piece of green yarn. Thread the
tapestry needle. You will be
creating knots at the end of the “hands”, while threading the green yarn thru
the arms so the trail is not visible.
You can also
trail the green thread down the trunk in a spiral fashion to create “vines”.
Also, don’t
forget about the head and the new “foliage” you just created- make sure to add
knots of green up there as well.
Secure all
loose ends.
Using black embroidery thread, carefully create a smile or smirk that would be fitting for a Baby Groot...clearly my example got a little carried away with the smile.
Now you have
a baby tree (Baby Groot)
With the
base we created he can stand up by himself, or you can put him in an
appropriate sized pot. Feel free
to go crazy with the Green at the base if you want it to look like he’s really
potted.
 For those that maybe don't understand the interest or realize there is a need for baby Groots in the world, I encourage you to do a google search (or whatever search engine you prefer to use). I found this handy model while surfing the good old internet today.
Baby Groots...they're awesome. Now go watch Guardians of the Galaxy...especially if you haven't seen it yet.

11 comments:
To do moveable arms, just insert some beading wire into the I-cord, either before or after you've made it. You can also cut the fuzz off of a pipe cleaner and use that. :)
Thanks for the advice Kellie! Both sound like great options!
Hi Amber,
Thanks for this pattern and your guide + tips. About how much primary yarn will I need for the pattern?
Melina
Hi Melina!
Honestly I didn't measure the yardage I used. But with a new skein of Vanna's Choice Lions Brand yarn, I used less than the full skein, probably even 1/3 of the skein. But how much yarn you use depends on how big you want your baby groot. I will be making another Groot soon and will measure out the yardage and let you know. Sorry I don't have an accurate number to give you right now.
This pattern is awesome! Thank you for sharing it! I am using Quince & Co. Lark for the body and Chickadee for the green bits. I am using a US 3. I used a twist tie to make the arms move.
This little guy is completely adorable!!! The pattern is amazing, thank you so much for sharing!
I guess I am a little slow. If I start with 6 stitches and increase a stitch in every other stitch then end up with 9 stitches not 12. What am I missing?
It’s a knit 1, make 1 repeat, so you would actually be picking up 1 Stitch between each knit stitch which would equal 12 stitches (you would make one after the last knit stitch also). You can google make 1 stitch for a description that would be better than I could give. Hope that helps
bonjour, je viens de découvrir, j'adooooooooore, j'ai imprimé,je le fais ce weekend, mille mercis pour ce gentil bb groot
Hiya! Is there anyway of creating or has anyone done it with 2 needles instead of circular. TIA :)
Post a Comment